
Plugging away at energy efficiency
Tim Eden had already ditched the fossil fuels and electrified his house, but the DIY modificatons he made to his 1960s home made it even more energy efficient and comfortable.
At the same time as ditching fossil fuels and electrifying my house, I have been plugging away at improving its energy efficiency. After getting rid of the last two gas appliances in the house, I wanted to reduce my electricity usage and make the most out of my solar system.
My house was typical of many older Australian houses - full of draughts, very cold during winter, and hot in summer. In the middle of winter, overnight temperatures inside plummeted to 12-13 degrees upstairs and would often drop below 10 degrees downstairs. To illustrate how unpleasant it can be, I got chilblains on my fingers while working from home during COVID lockdowns.
I had not heard of chilblains before then, but according to the doctor they were common during the COVID lockdowns, presumably because there were many more people at the time working from home in their cold and draughty Australian houses.
Passive houses have always intrigued me - I imagine they would be very comfortable to live in. After reading an article on retrofitting older houses for warmth in The Guardian, I made an inquiry with the ACT based company it featured. Being a data driven person I wanted to understand how bad the problem with my house was.
Although that company didn’t provide services to the Sydney area where I live, they recommended searching for an accredited Nationwide House Energy Rating Scheme (NatHERS) assessor, or air leakage tester, in my local area using the following websites:
NatHERS assessor - https://www.absa.net.au/find-an-assessor/
Air tightness tester - https://www.bcta.group/attma/members/air-tightness-testers/australia/
A NatHERS assessment and air tightness test are two methods for identifying energy efficiency problems in your house and working out how to address them. Each approaches the problem in slightly different ways.
NatHERS provides energy star ratings for new dwellings and uses a computer modelling system to predict the amount of energy it takes to heat and cool a home. The CSIRO based model takes into account things like building construction, layout and orientation, and more recently whether you have solar and/or a home battery installed.
An air tightness test measures how leaky a building is, expressed in terms of air changes per hour, or ACH for short. During the test a large calibrated fan is set up in an external doorway which sucks air out of the house, while pressure sensors measure how quickly the air rushes back in.
The average new Australian house measures 15.4 ACH @ 50 Pa as found by a CSIRO study into leakiness. A standard pressure of 50 Pascals is referenced to allow for easy comparisons and is equivalent to outdoor wind speeds of approximately 30 km/h. For reference, a certified passive house must be less than 0.6 ACH but this would be near impossible to achieve by retrofitting an existing dwelling.
Another way to think about the average of 15 air changes per hour is that the entire volume of air in the house is exchanged with new air from the outside roughly every 4 minutes. As you can imagine, keeping houses that are this leaky comfortable requires a lot of energy as the new air coming in has to be constantly heated or cooled.
Starting off leakier than the average house
I started with an air tightness test and engaged a local contractor who promptly responded to my enquiry. They explained the results for my house and how they compare with other houses and provided a written report with the list of issues I needed to fix.
My starting point was 17.03 ACH @ 50 Pa. This is a bit worse than the Australian average of 15.4 ACH. The result didn’t surprise me given the performance of the house during winter and summer, but now I had a better understanding of why.
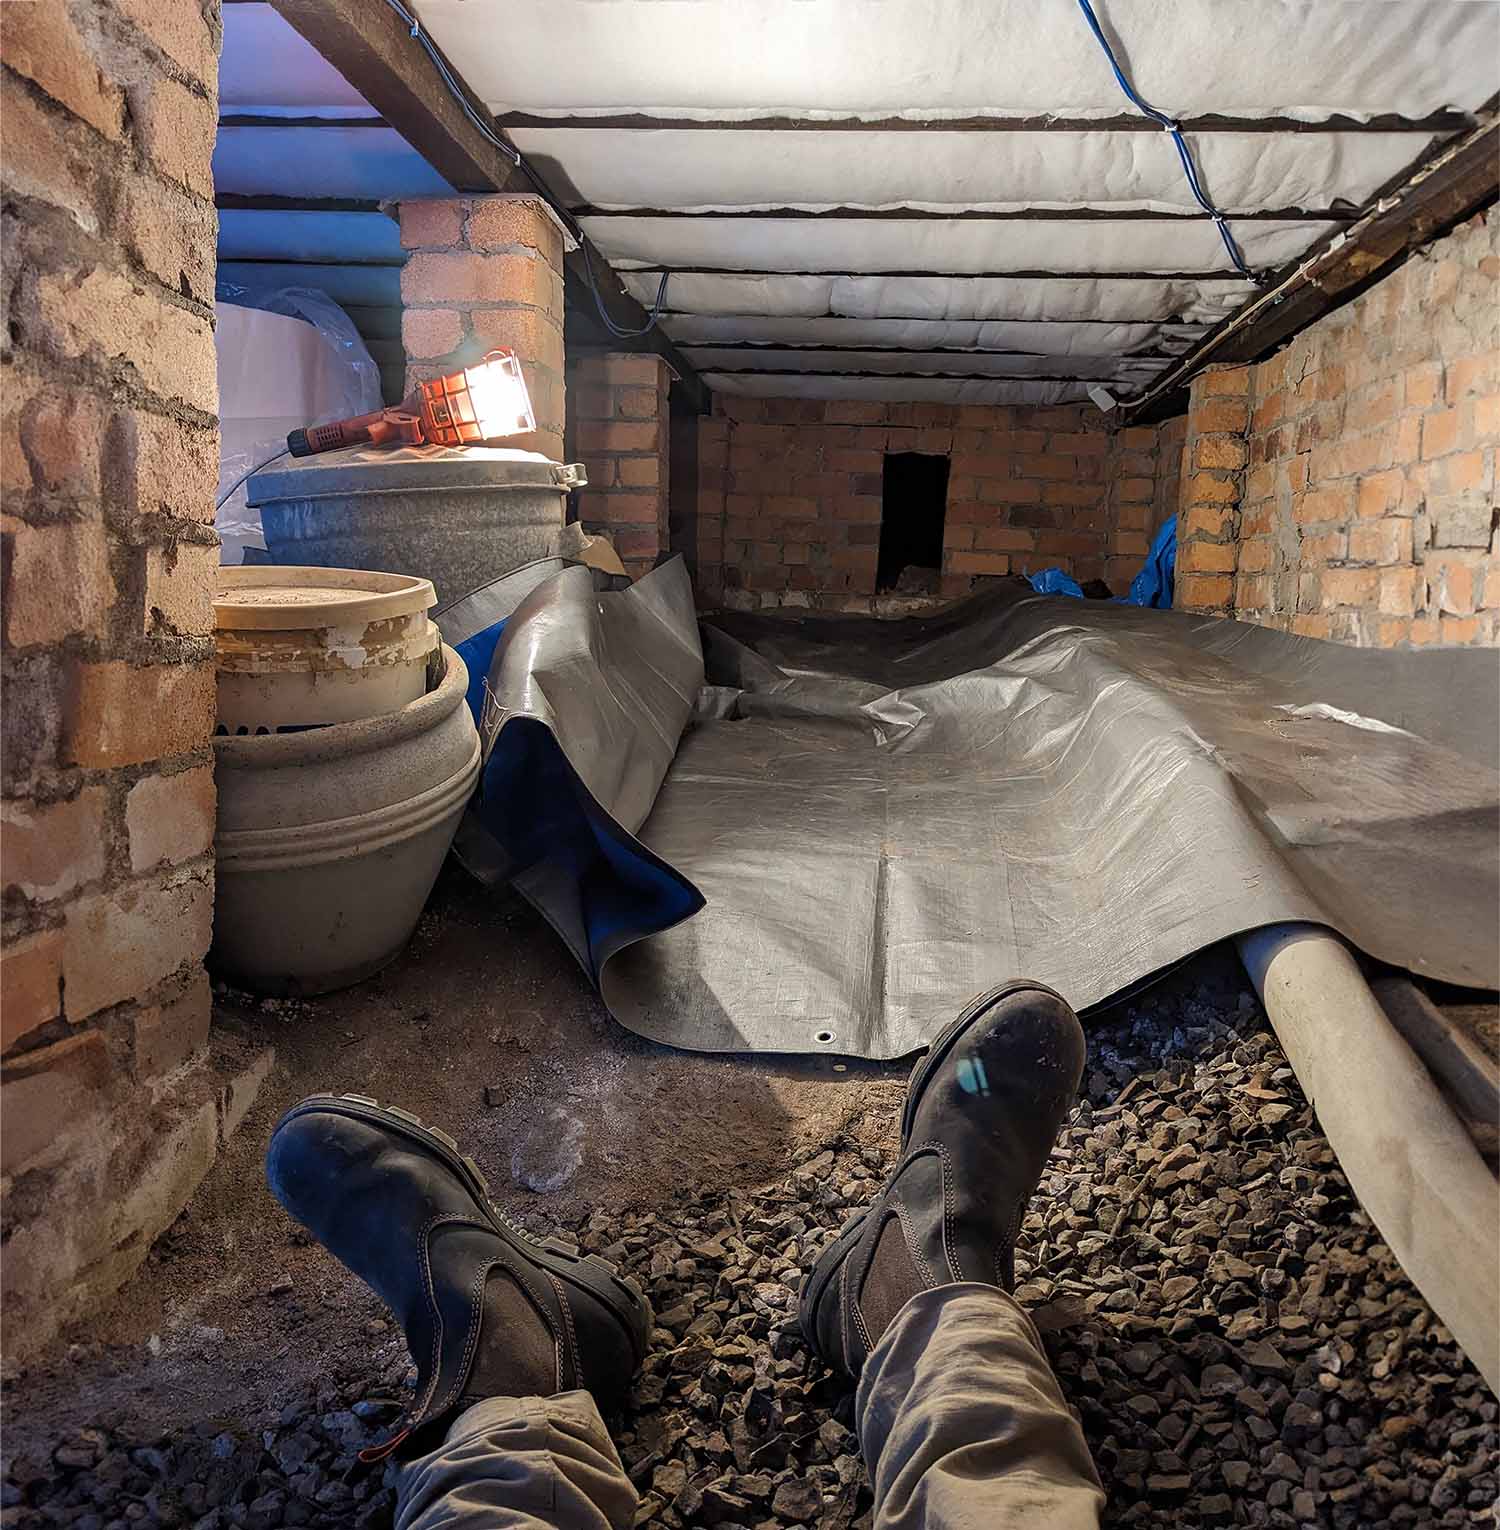
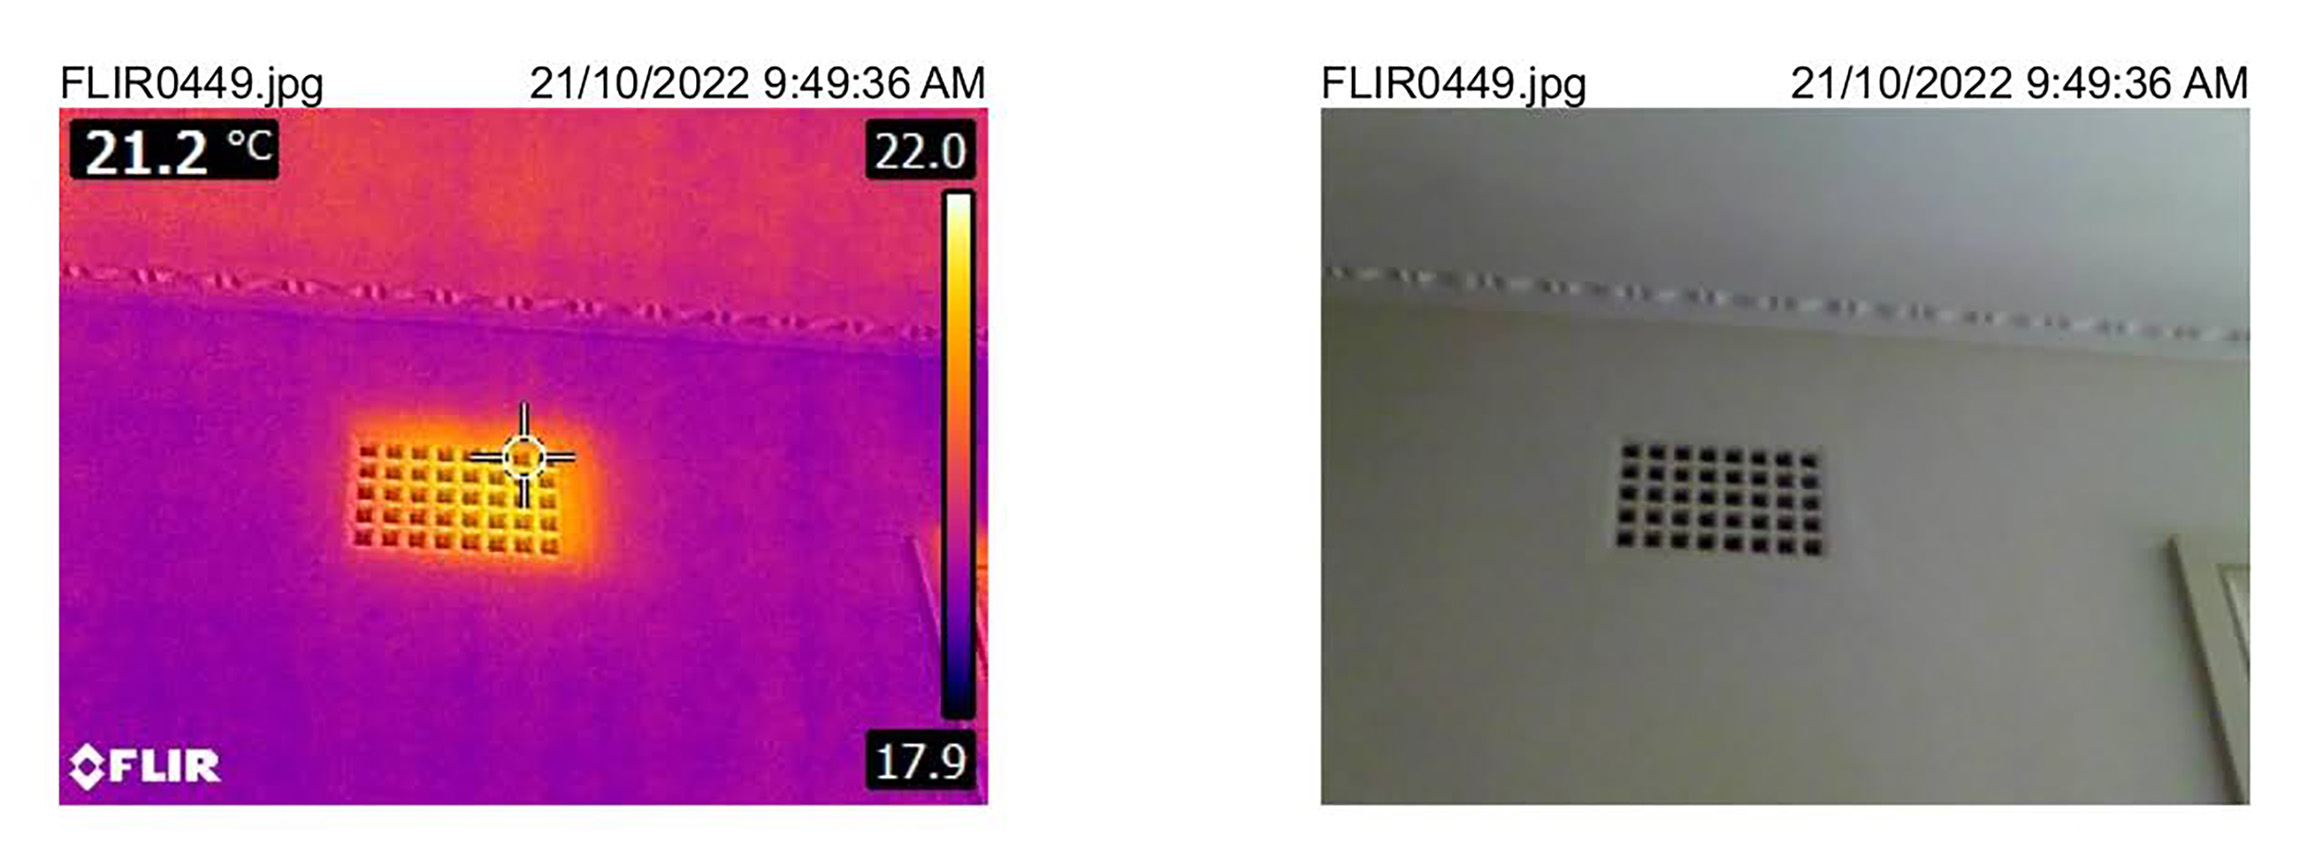
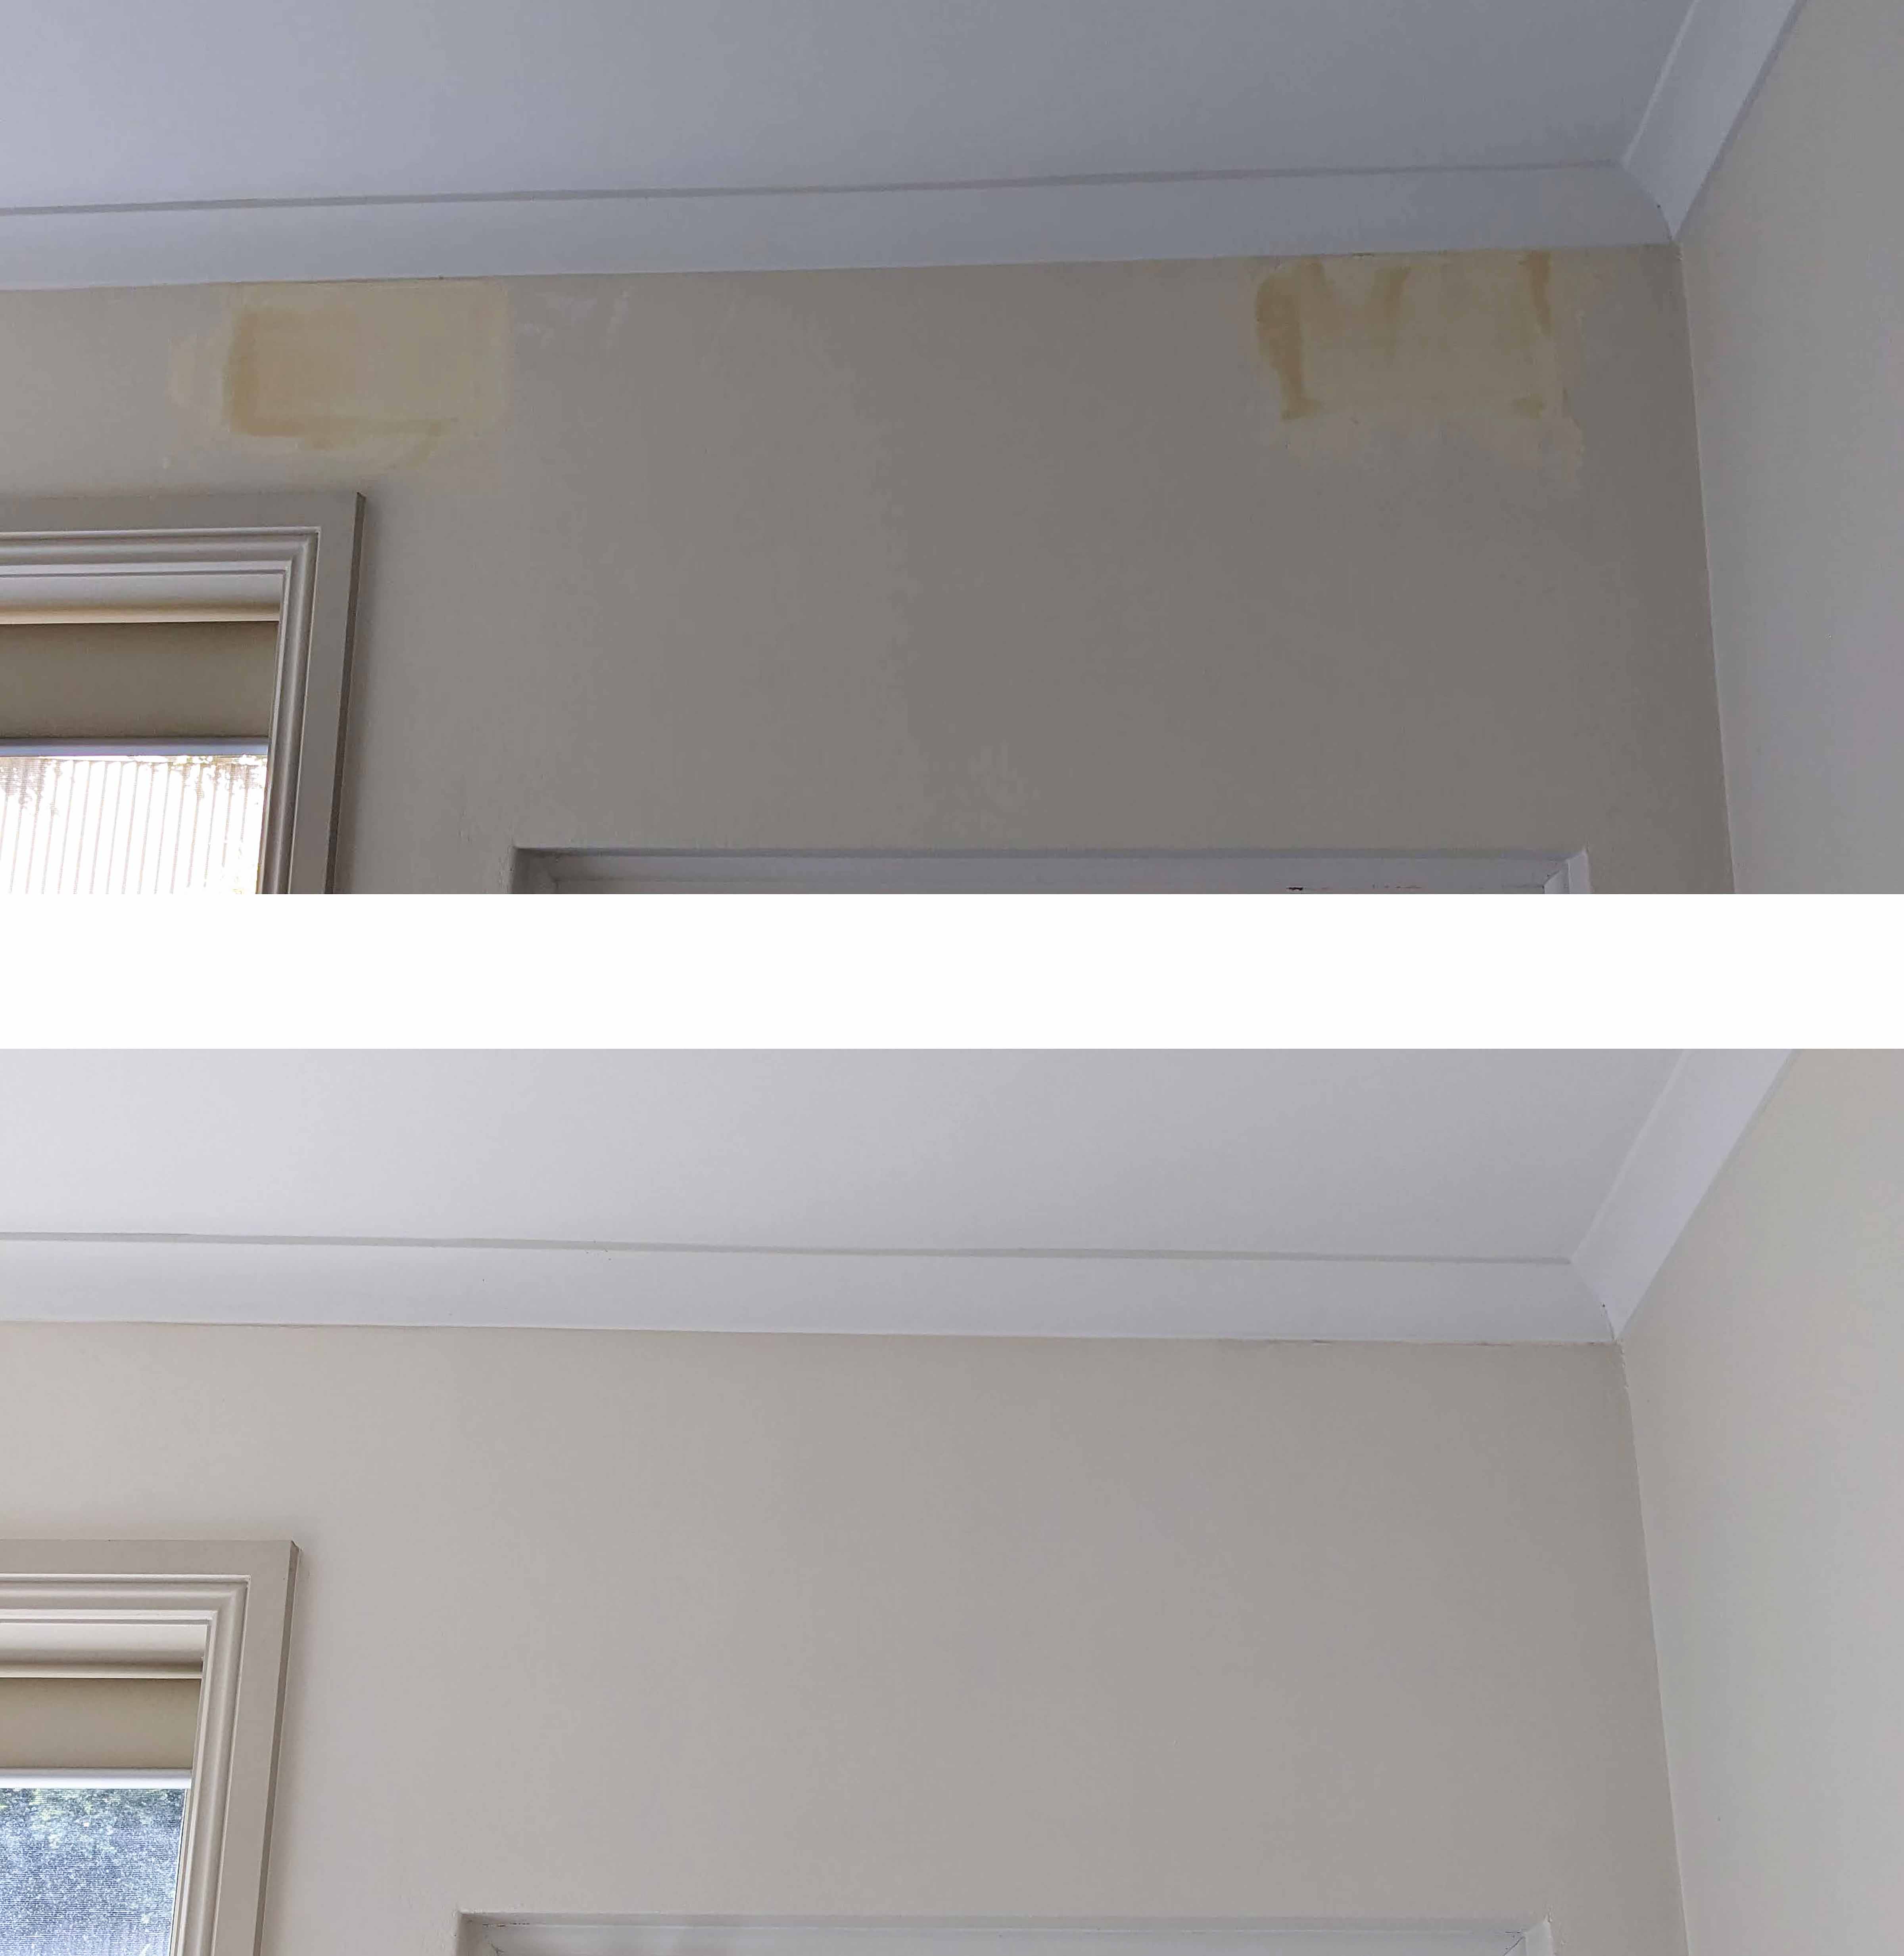
After completing his measurements, the contractor left the blower door running while we walked around the house together with his thermal imaging camera and a mini smoke machine searching for problems. Using these tools and his experience he was able to identify numerous places that were the source of draughts.
Some of these problems were obvious, such as the rectangular vents present in every single room, or the ventilated cornice in the bathroom and toilet ceilings. My house is a two storey double brick house, built in 1960, and included these design features to allow for unflued gas heaters, wood fireplaces or kerosene heaters which were still common back then.
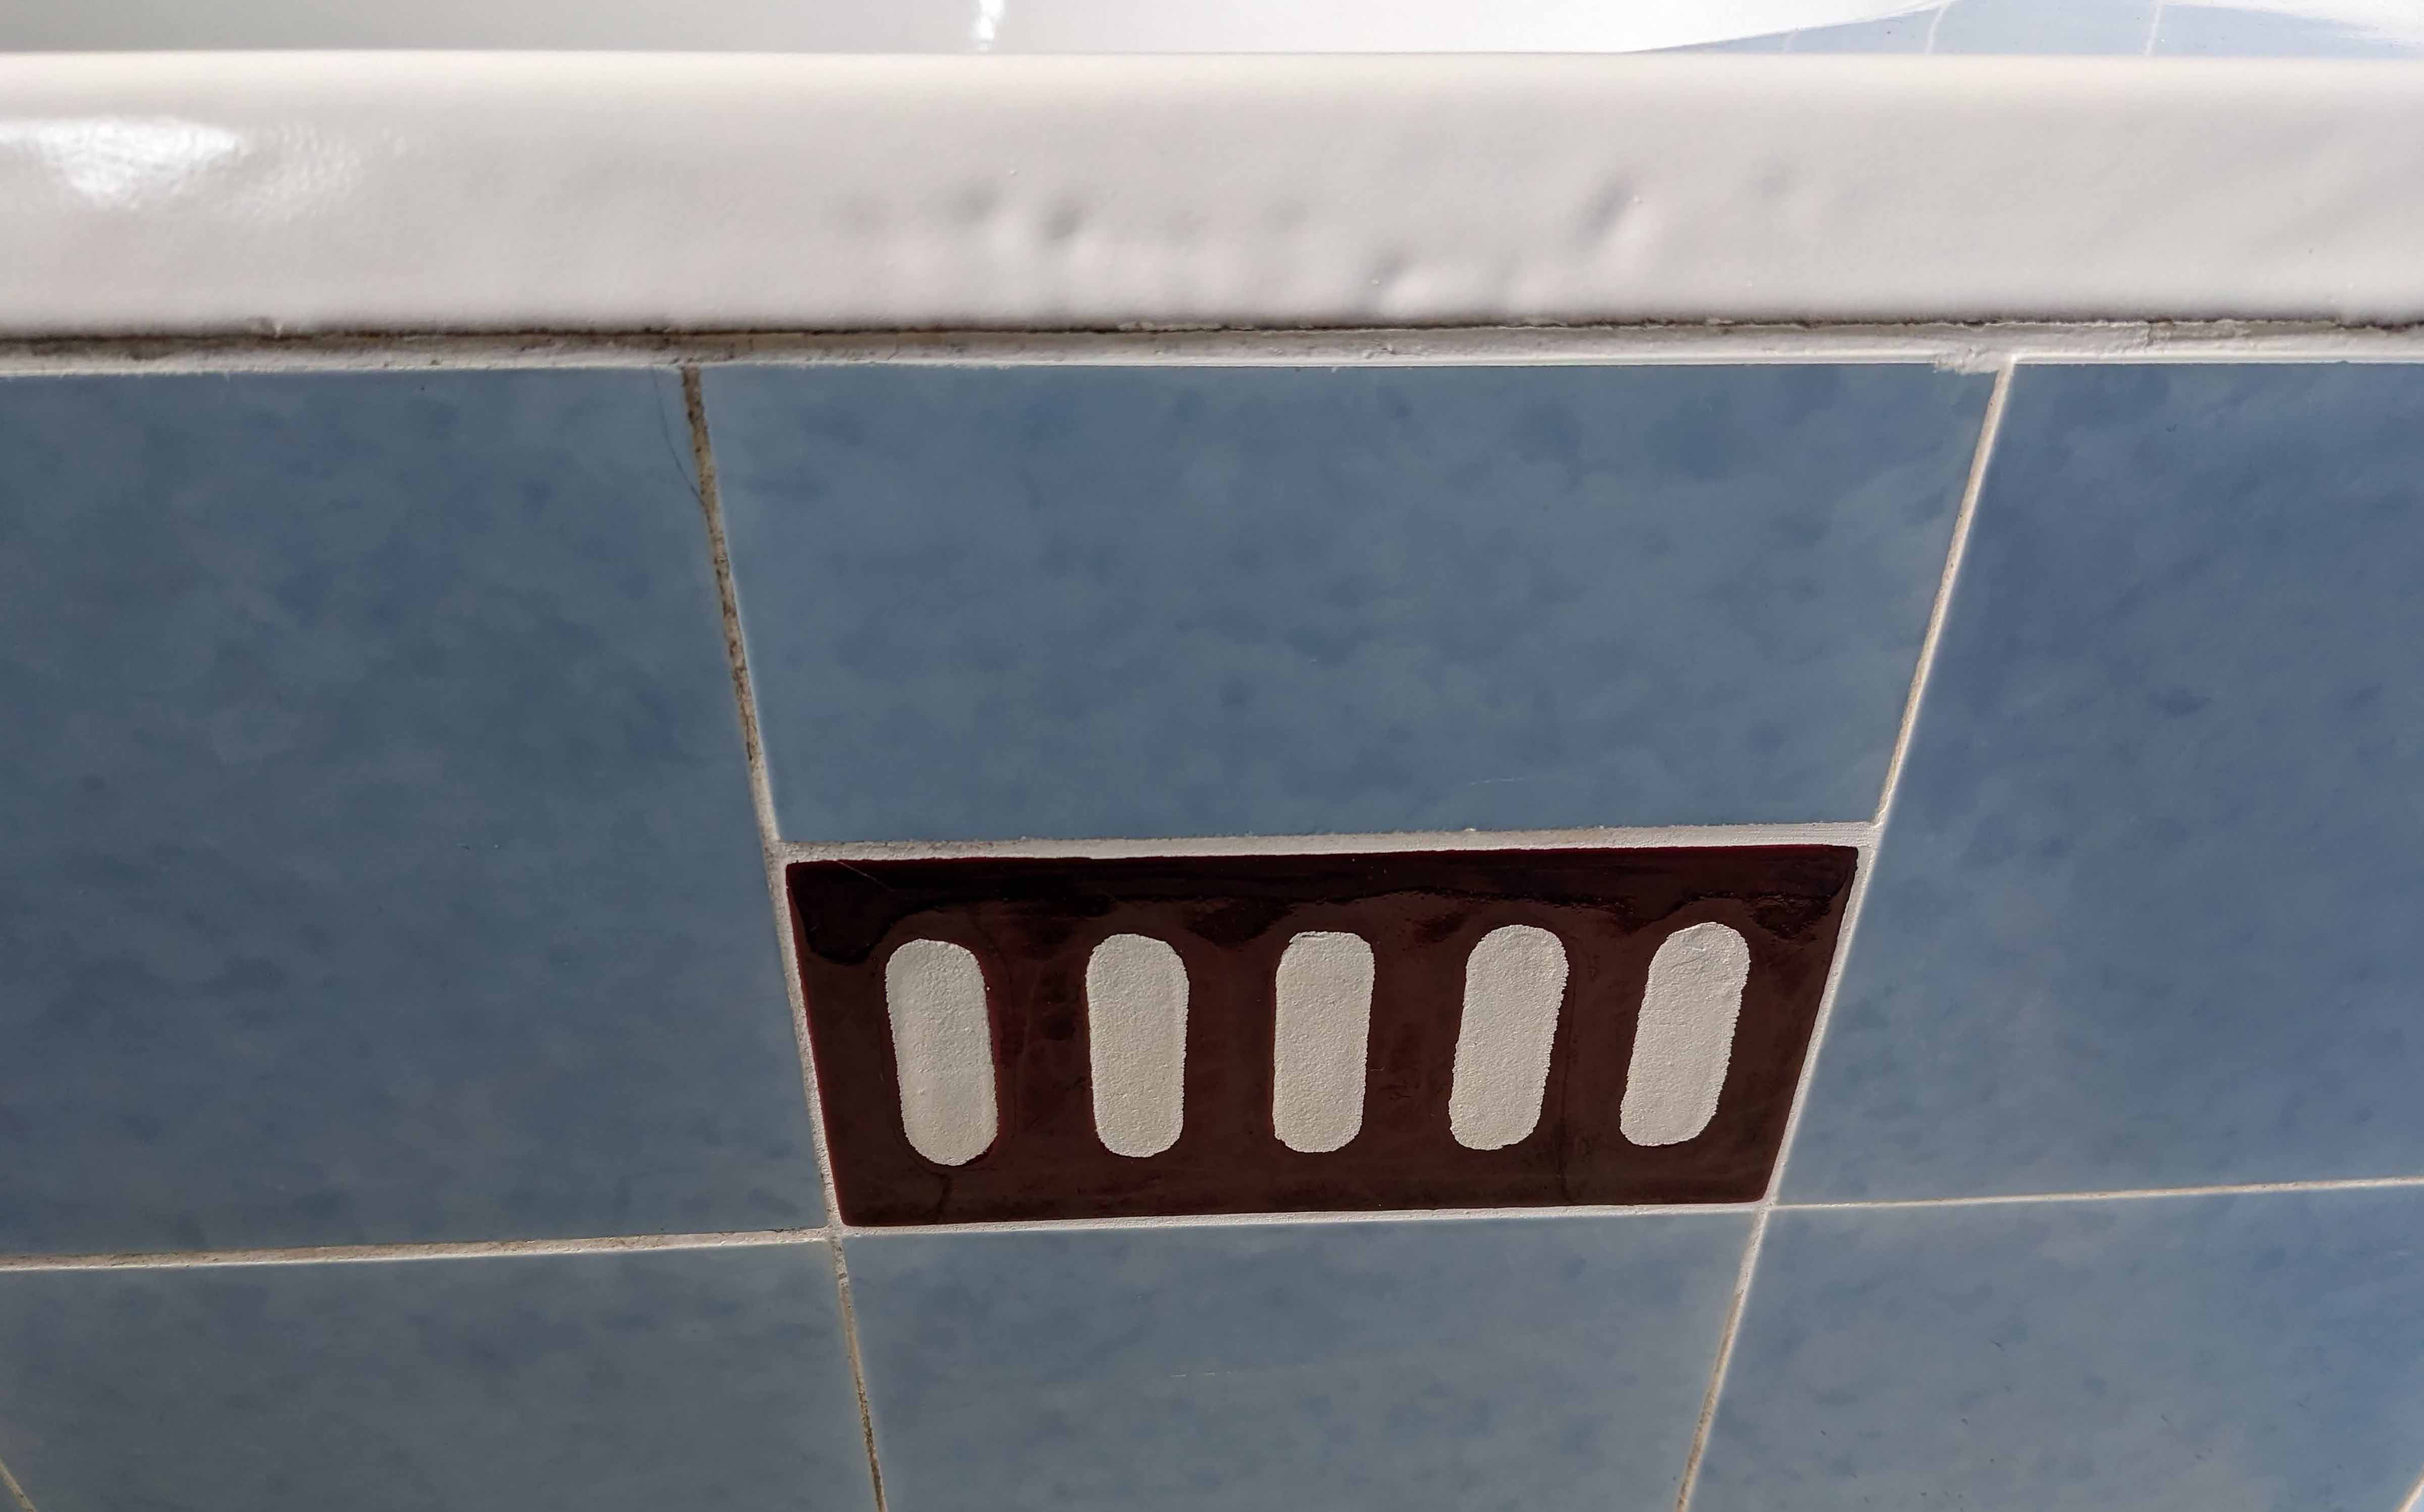
Other gaps were not so obvious, such as these odd vents on the side of the bath. I have no idea why they are there, although once I had finished sealing the obvious gaps in the bathroom, air would rush in through these vents when the exhaust fan was running.
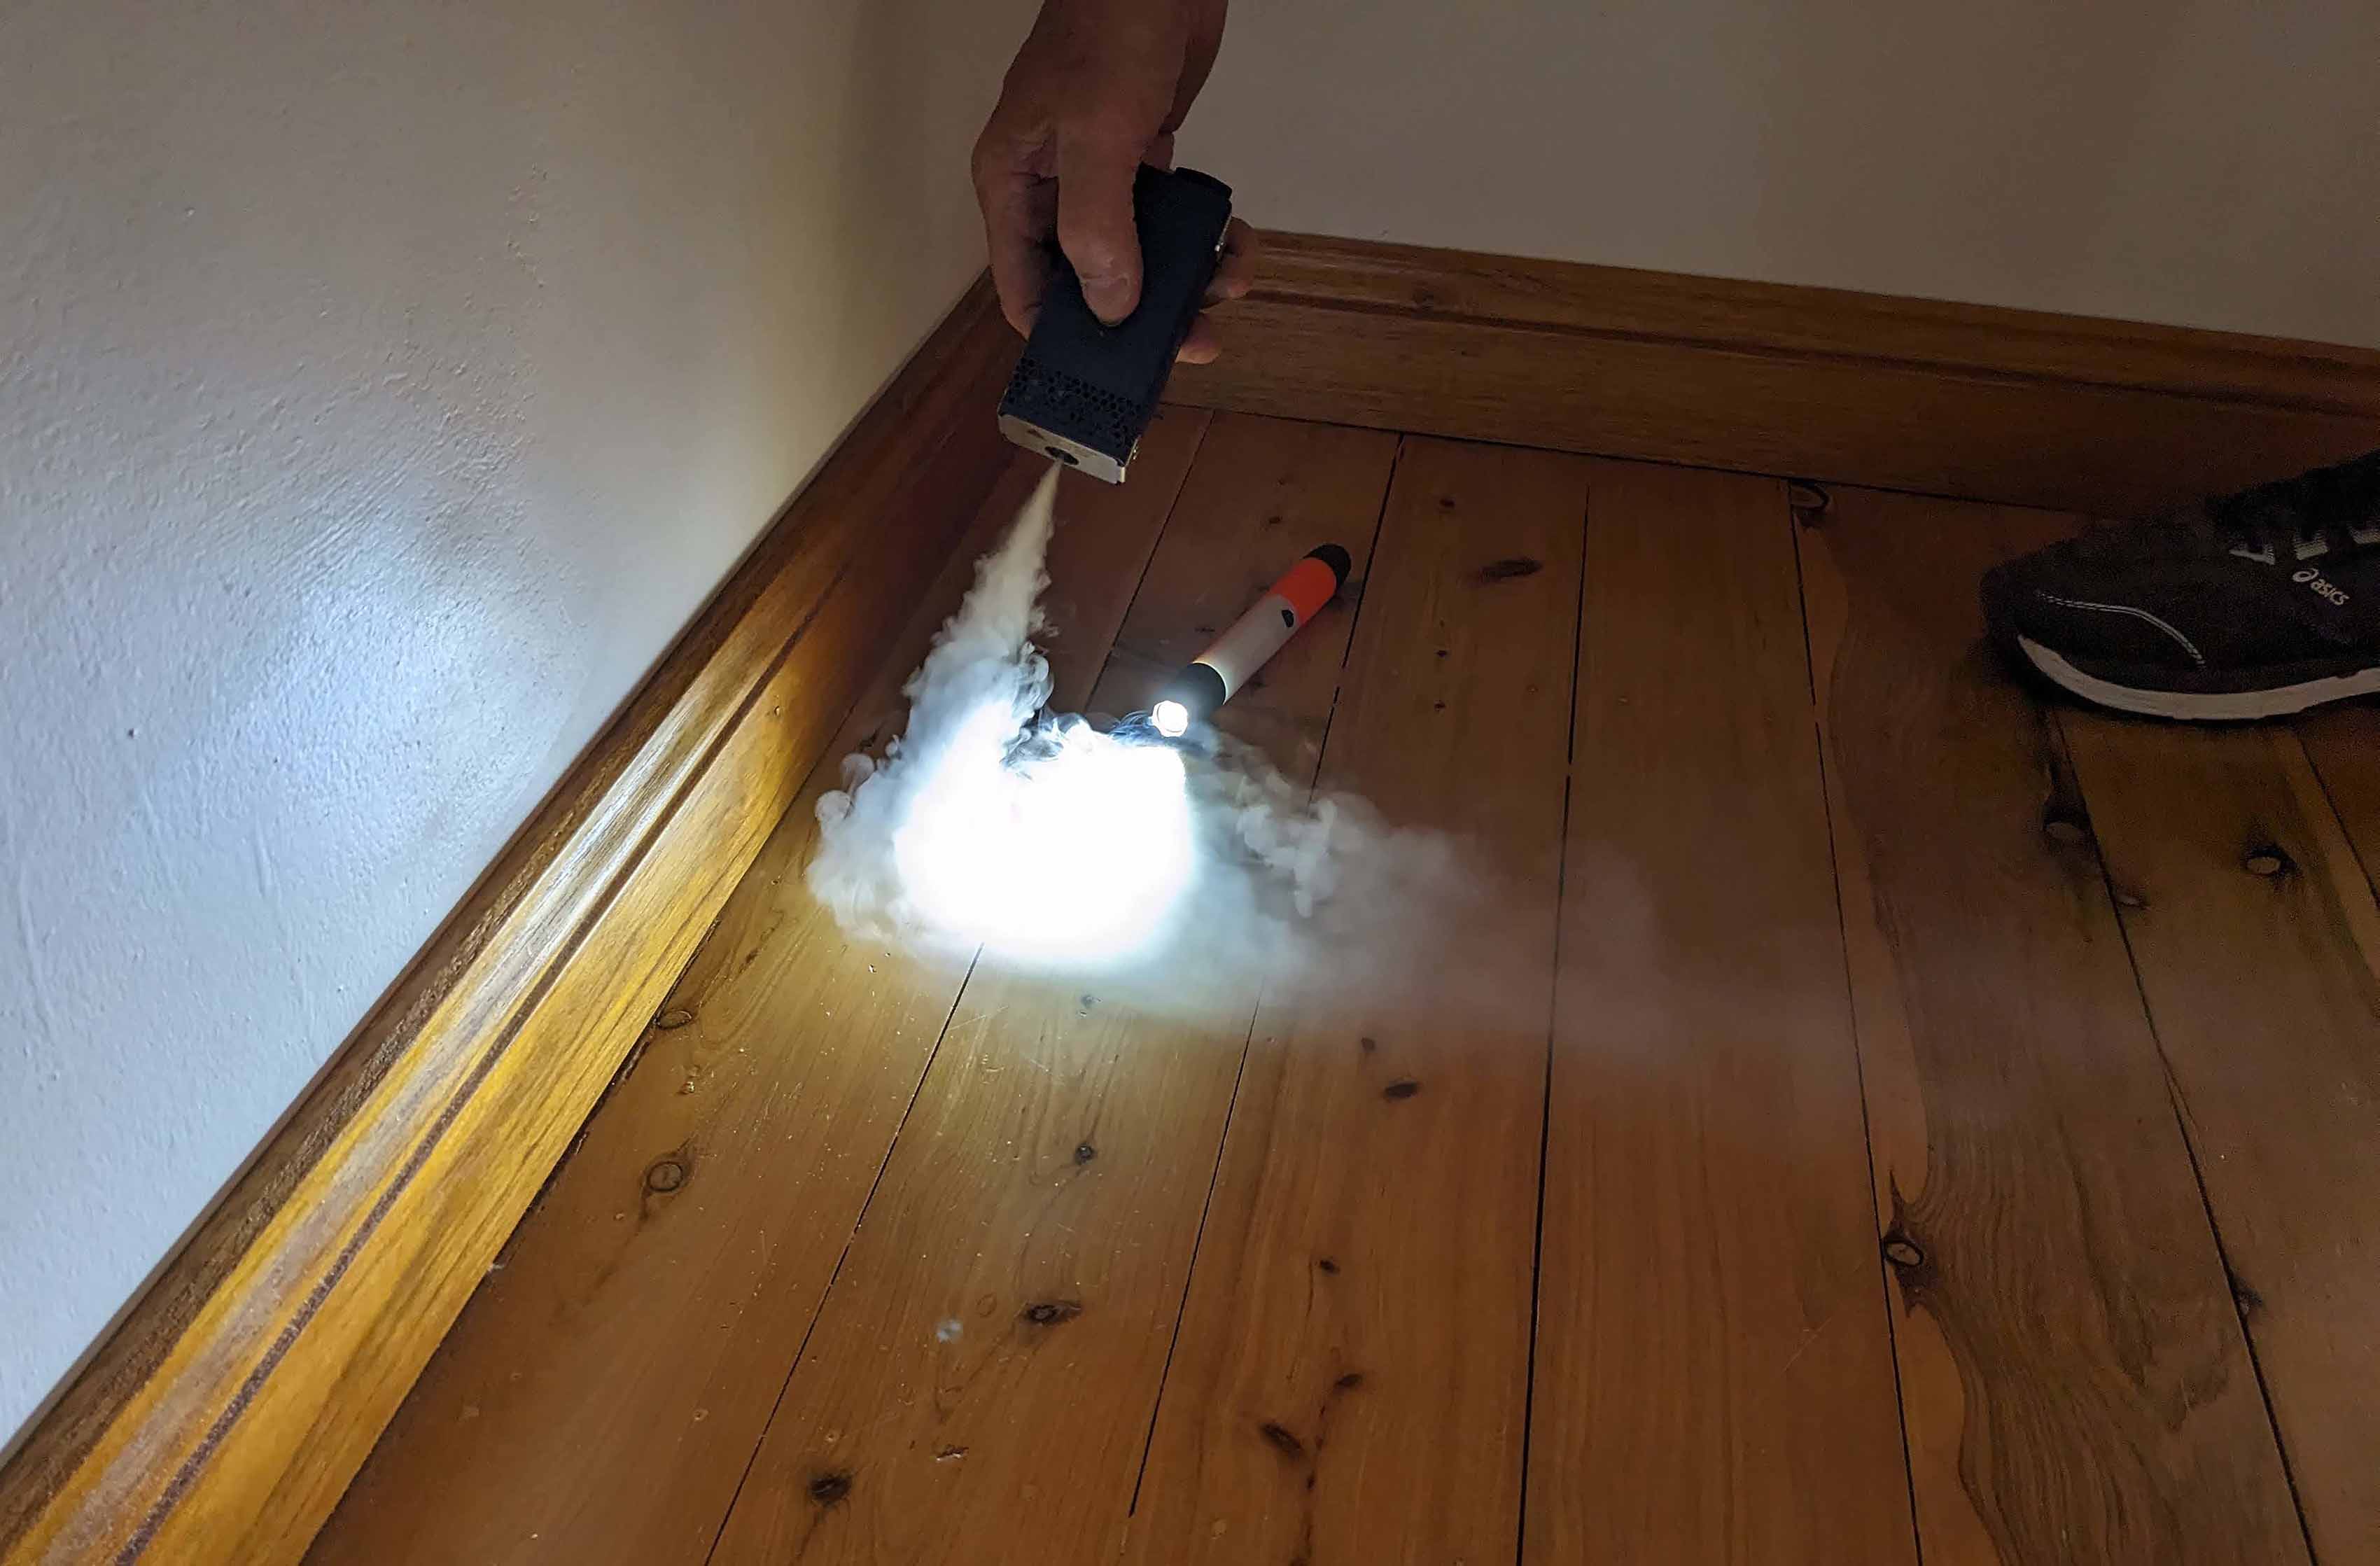
With the blower door running, the worst gaps could be identified easily by holding my hand up and feeling the air blow past. The mini smoke machine was also helpful to locate exactly where a small gap was. For example, some sections of skirting board had small gaps underneath them.
Plugging the gaps
With my list of gaps, and a trip to the Bunning’s draught aisle, I was ready to start work.
Most of the fixes can be done yourself if you know how to use basic tools like a broad knife, caulking gun and a paintbrush to touch things up. Otherwise a local handyman should be able to do everything for you, although I would encourage people to give it a go themselves as it can be fun and rewarding.

Acrylic joint sealant was used around window architraves and small gaps. For large gaps you might need to source blocks of foam. The cabinetry behind my microwave for instance was leaking badly during the blower door test. A piece of high density foam cut slightly larger than the gap plugged this hole nicely.
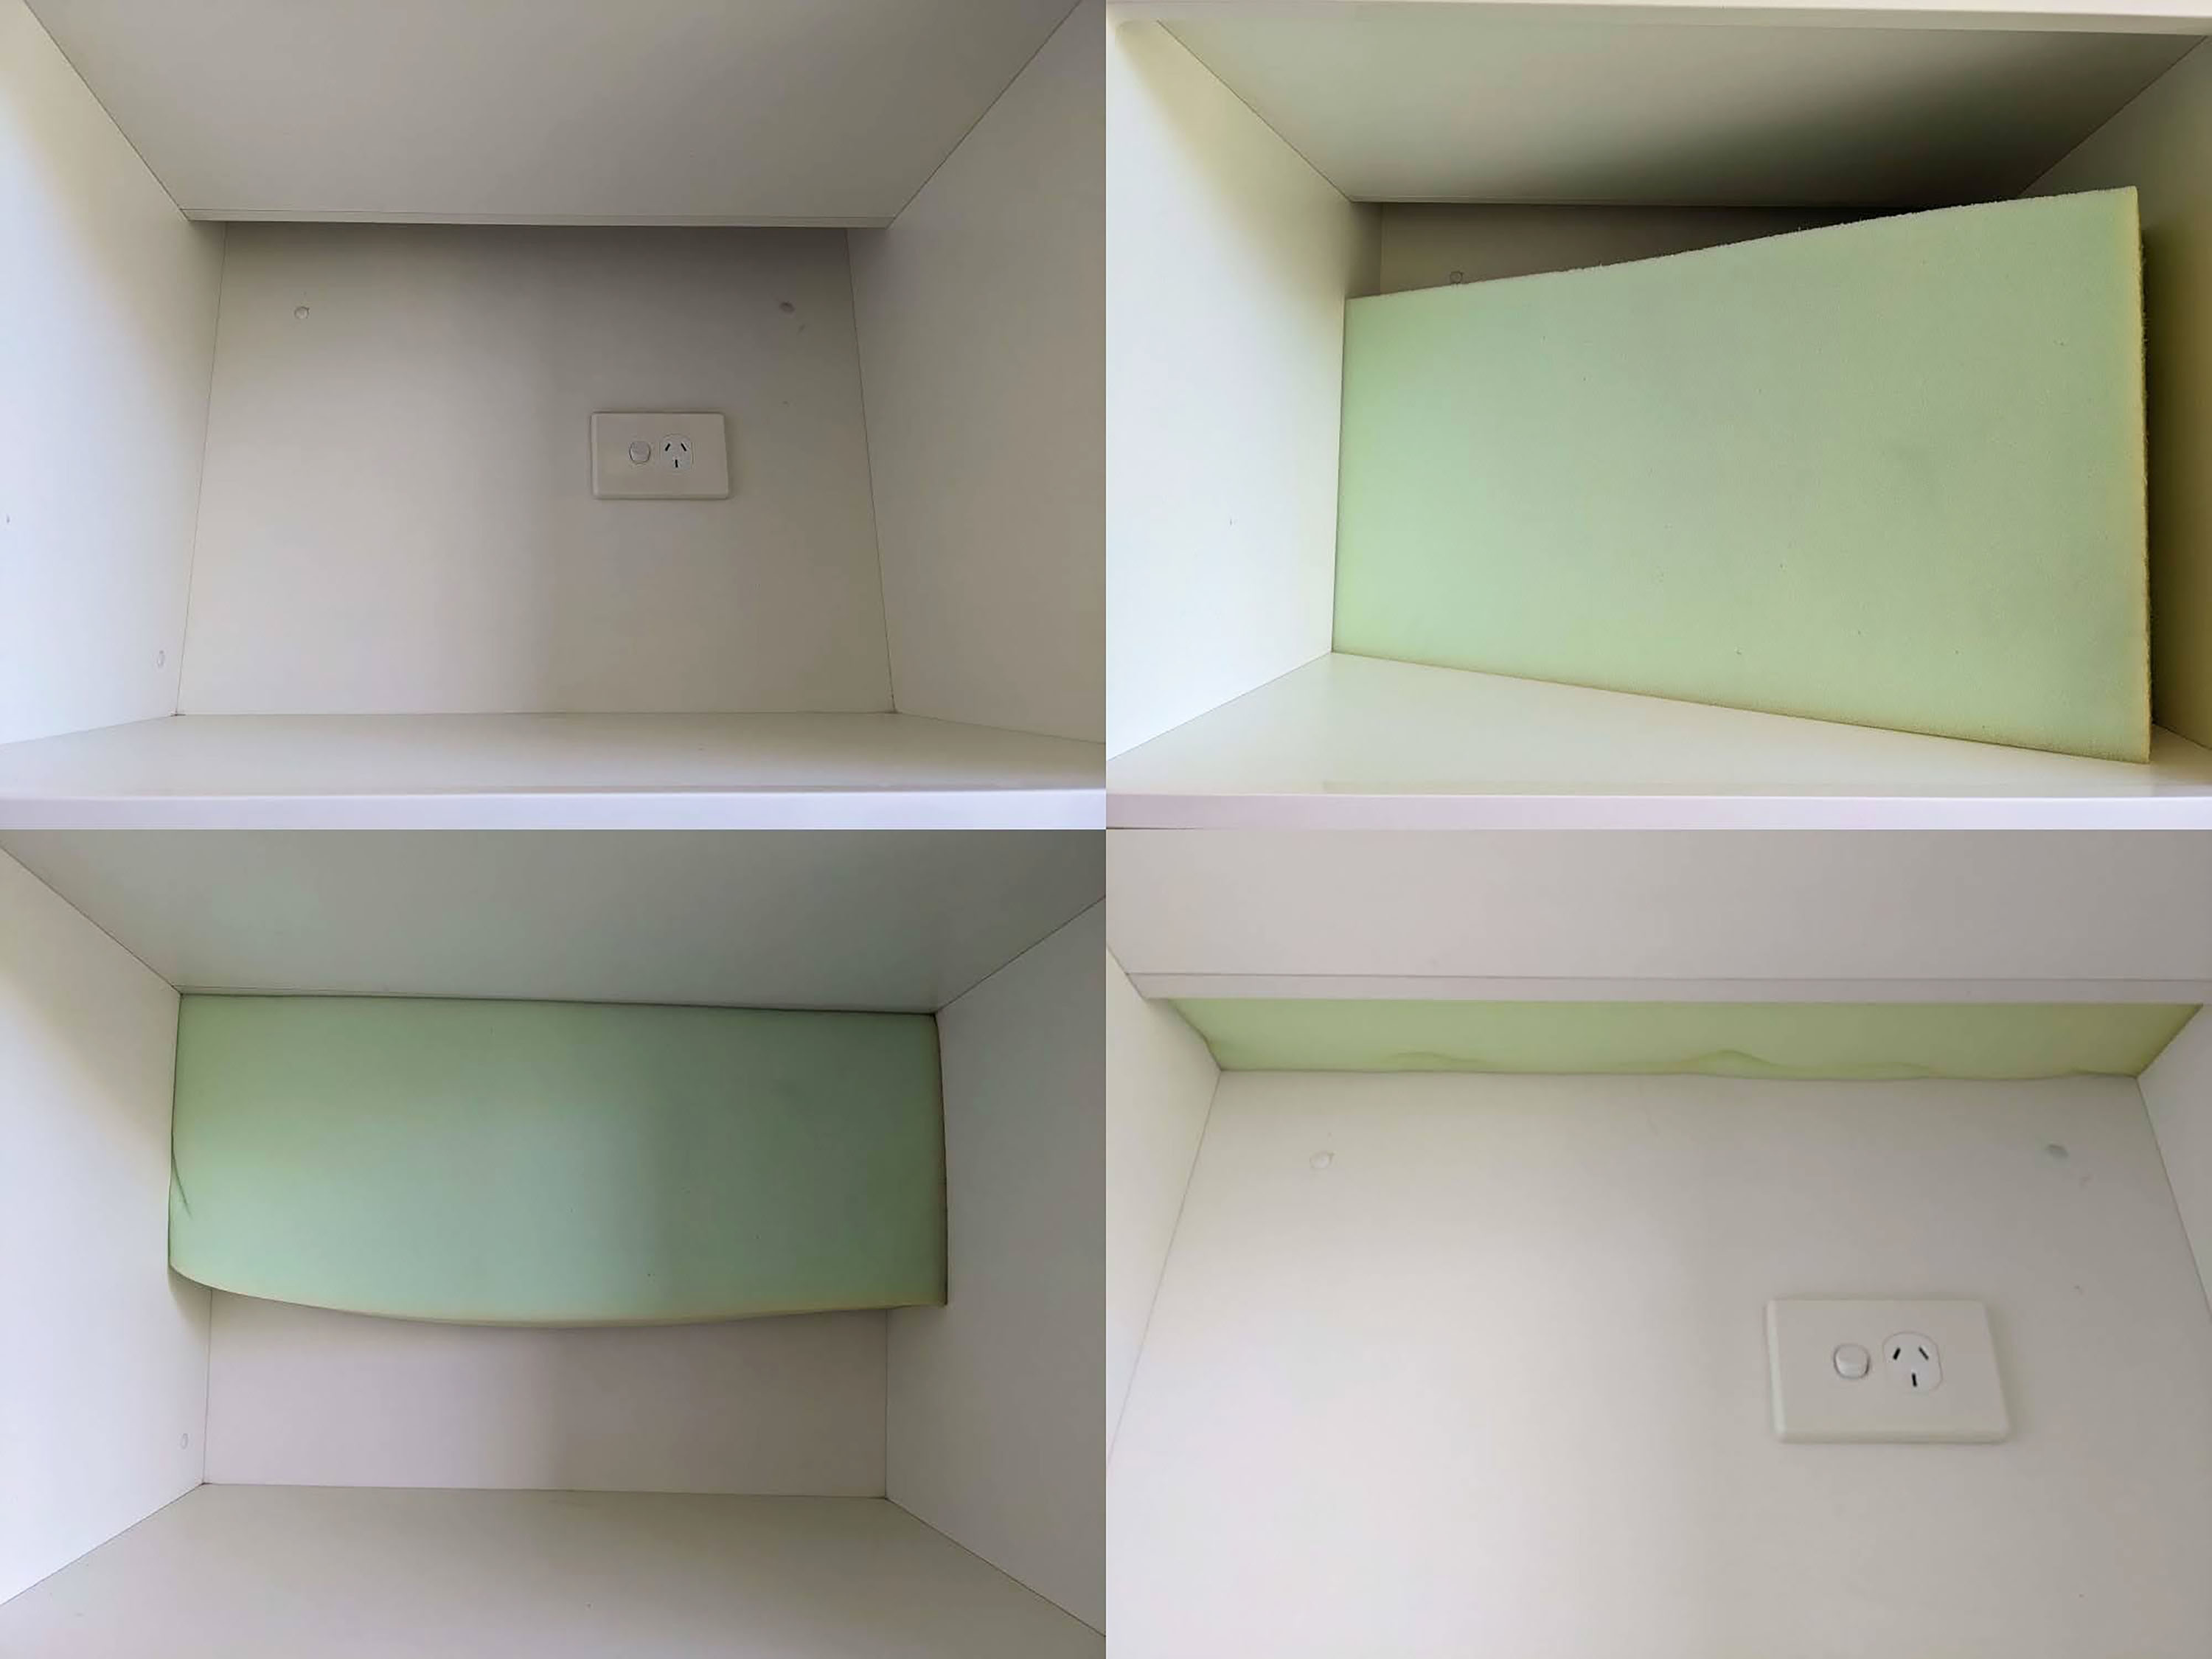
For the rectangular air vents I used three different products to achieve a smooth finish before painting over them. Firstly, I used cornice cement for the bulk first coat filling the holes, followed by Pro-Repair 10 and lastly topping compound, normally used for patching or joining sheets of gyprock.
The ventilated cornice in the bathroom and toilet ceilings was plugged with some gap filler rod first and then smoothed over with cornice cement which dries hard and can easily be sanded to a smooth finish.
The biggest job by far was installing underfloor insulation for the downstairs parts of the house with floorboards. As well as insulating the floor, this helps to seal the gaps between floorboards. I used insulation made from PolyEthylene Terephthalate (PET), like plastic bottles, with an R2.5 rating.
Underfloor insulation works much the same way as ceiling insulation although mine was installed by stapling it to the joists to hold it in place. All up it took me 3-4 days to install around 50 square metres of insulation. I had to enlist the help of a teenage son who was able to squeeze into the tightest areas.
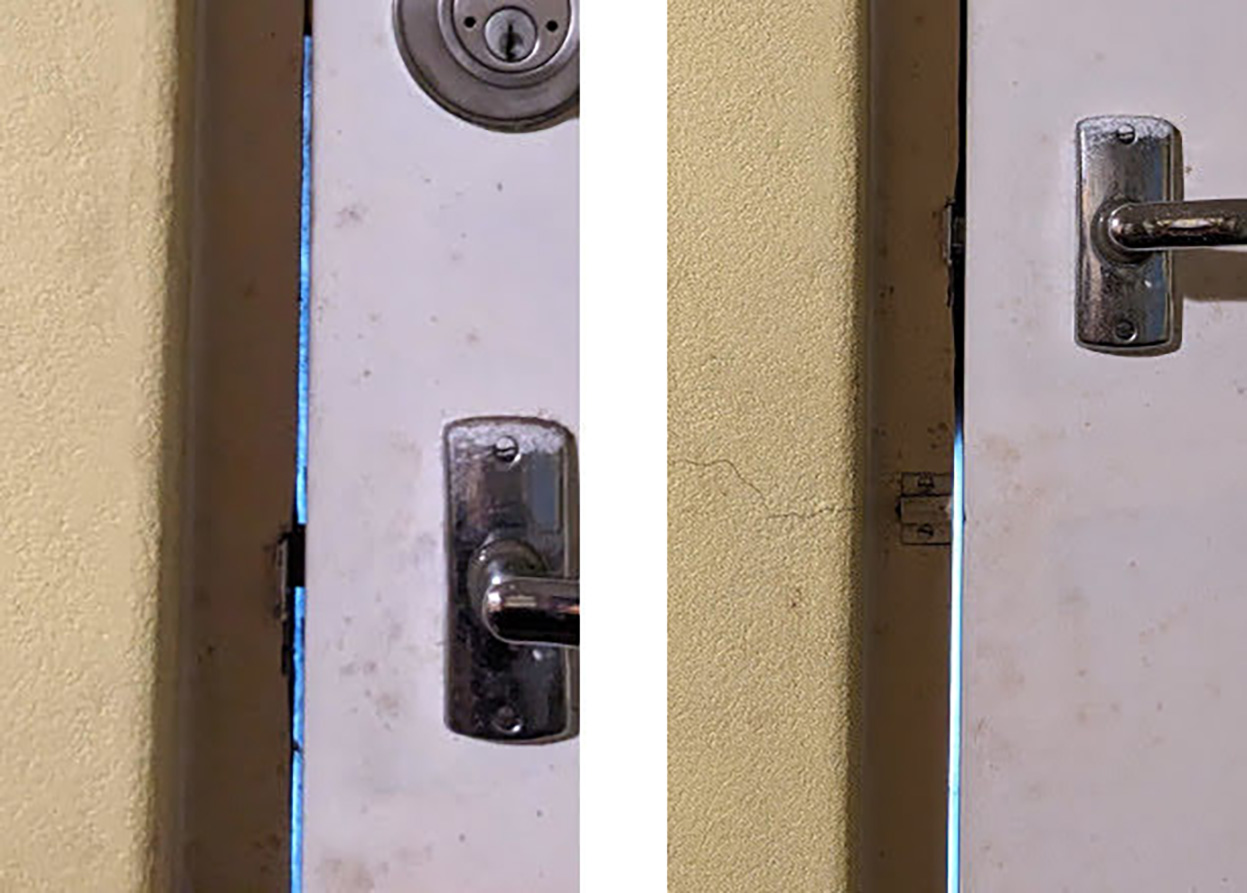
Last but not least, the doors in my house were one of the worst sealed areas. I found installing door seals to be the most fiddly job because I needed to adjust the latch afterwards on a couple of doors so they would still close easily while sealing the draughts well.
Half as leaky and also much quieter
After ticking off the last job on the list, I was keen to retest my house and measure the improvements. Prior to the test I was hoping for something below 10 ACH.This is the requirement for new dwellings in the UK and was also recommended by CSIRO as the benchmark for new Australian homes.
Just over a year since he first tested my house, the contractor returned and set up his blower door again. The new result was 8.15 ACH @ 50 Pa which I was very happy with. I’d successfully reduced the number of air changes by more than half compared to the original 17 ACH.
The house now feels much more comfortable and stable. It stays warmer inside during winter and cooler in summer. My temperature and energy monitoring systems also show clear and measurable improvements in terms of energy efficiency. (See the section with more data below.)
Sealing the gaps also came with other benefits I was not expecting. It is now much quieter inside with less road noise from the street, but I can still open a window to hear the birds outside. Less gaps also means less pests such as spiders and silverfish inside - they used to sometimes drop down from the vented ceiling in the bathroom.
Regarding cost, the air tightness tests were $715. Hardware supplies totalled around $500 but a decent chunk of this was paint. The underfloor insulation covered an area just over 40 square metres and was $1135 to purchase. I think these costs are very reasonable for the improved level of comfort and energy efficiency gains.
In terms of other improvements I could make, the windows are currently single glazed but replacing them with double glazed would be expensive. We already have ceiling insulation, although this could be replaced or boosted with higher performing insulation. To improve the air tightness even further, we identified a few small areas I can fix during the second test.
Overall I am very pleased with the results and the data clearly shows how improving the air tightness of your home can significantly reduce energy costs as well. It is hard to quantify the cost reduction without future electricity bills, but I estimate the improvements should reduce energy usage from heating and cooling by at least one third. This is significant because heating and cooling accounts for a large percentage of home energy costs.
This level of energy savings could not be achieved by swapping out appliances alone given my air conditioning system is reasonably new and efficient already. The relatively low cost of these efficiency improvements makes them a no-brainer, as the energy savings will cover the cost of materials required in just a few years.
Deep dive into the data?
For those who like to deep dive into the data like me, continue reading to find out how the reduction in air changes affected indoor temperatures and my energy usage for heating and cooling. These observations were made using data taken one year apart with similar outdoor conditions.
My temperature monitoring system consists of 1-wire temperature sensors and the power monitoring utilises real-time electricity consumption data from an Enphase Envoy-S unit attached to the solar system. Data is collected at one minute intervals using Prometheus and visualised with Grafana.
Last winter, prior to starting work on sealing gaps, my ducted air conditioning system cycled roughly every 12 minutes while heating the house. The graph below shows the temperature in my upstairs lounge room on the left axis in red, combined with power usage on the right axis in blue.
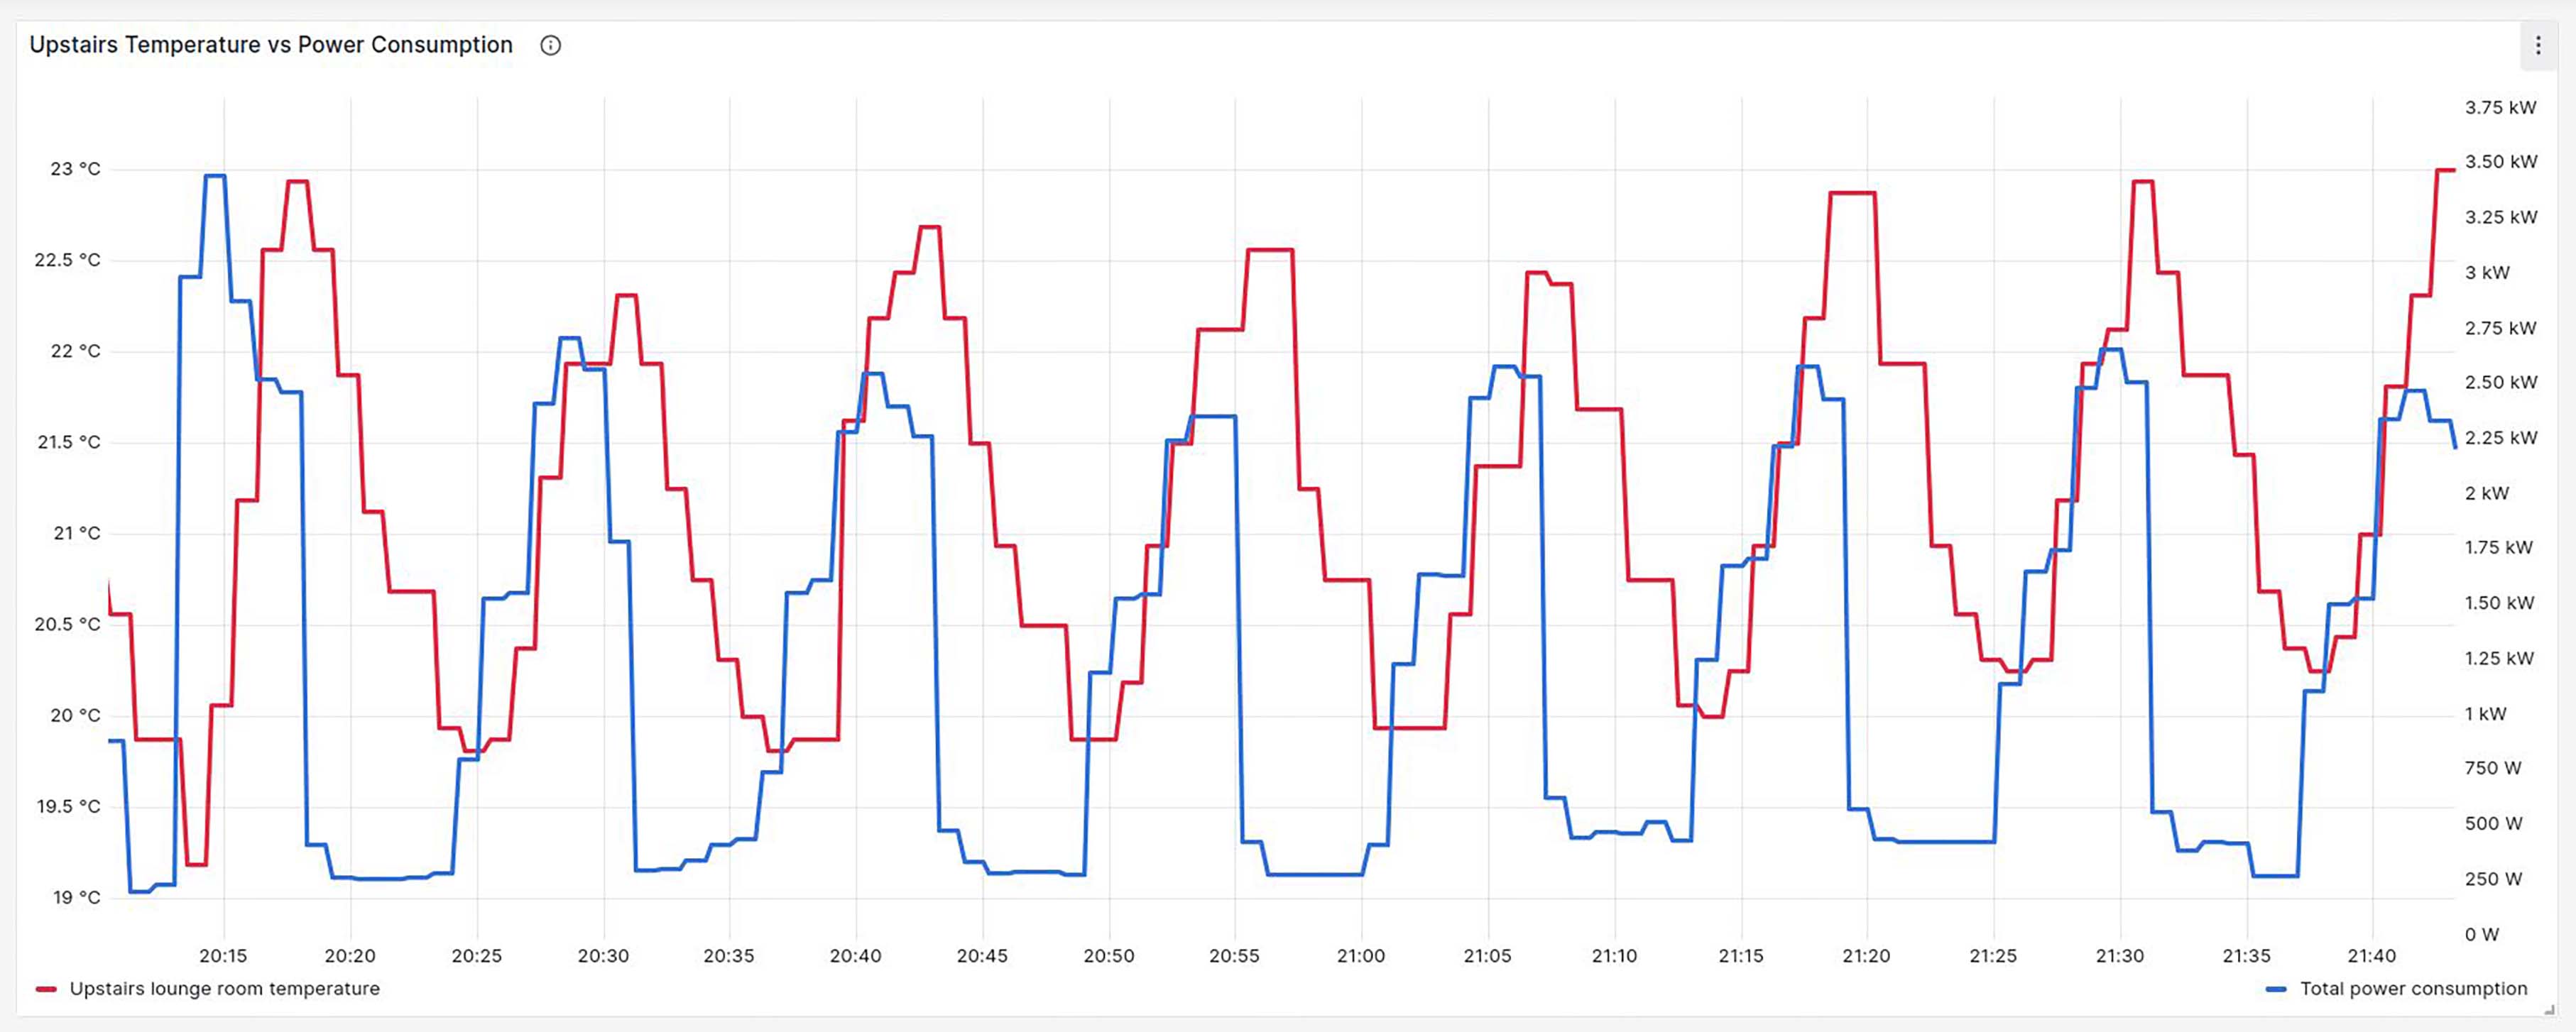
I expected that after sealing the gaps the air conditioning would need to run less often given it would take longer for the house to cool back down between cycles. This was somewhat true with the average cycle length increasing to 15 minutes. However, the main difference I observed is the shape of the graphs.
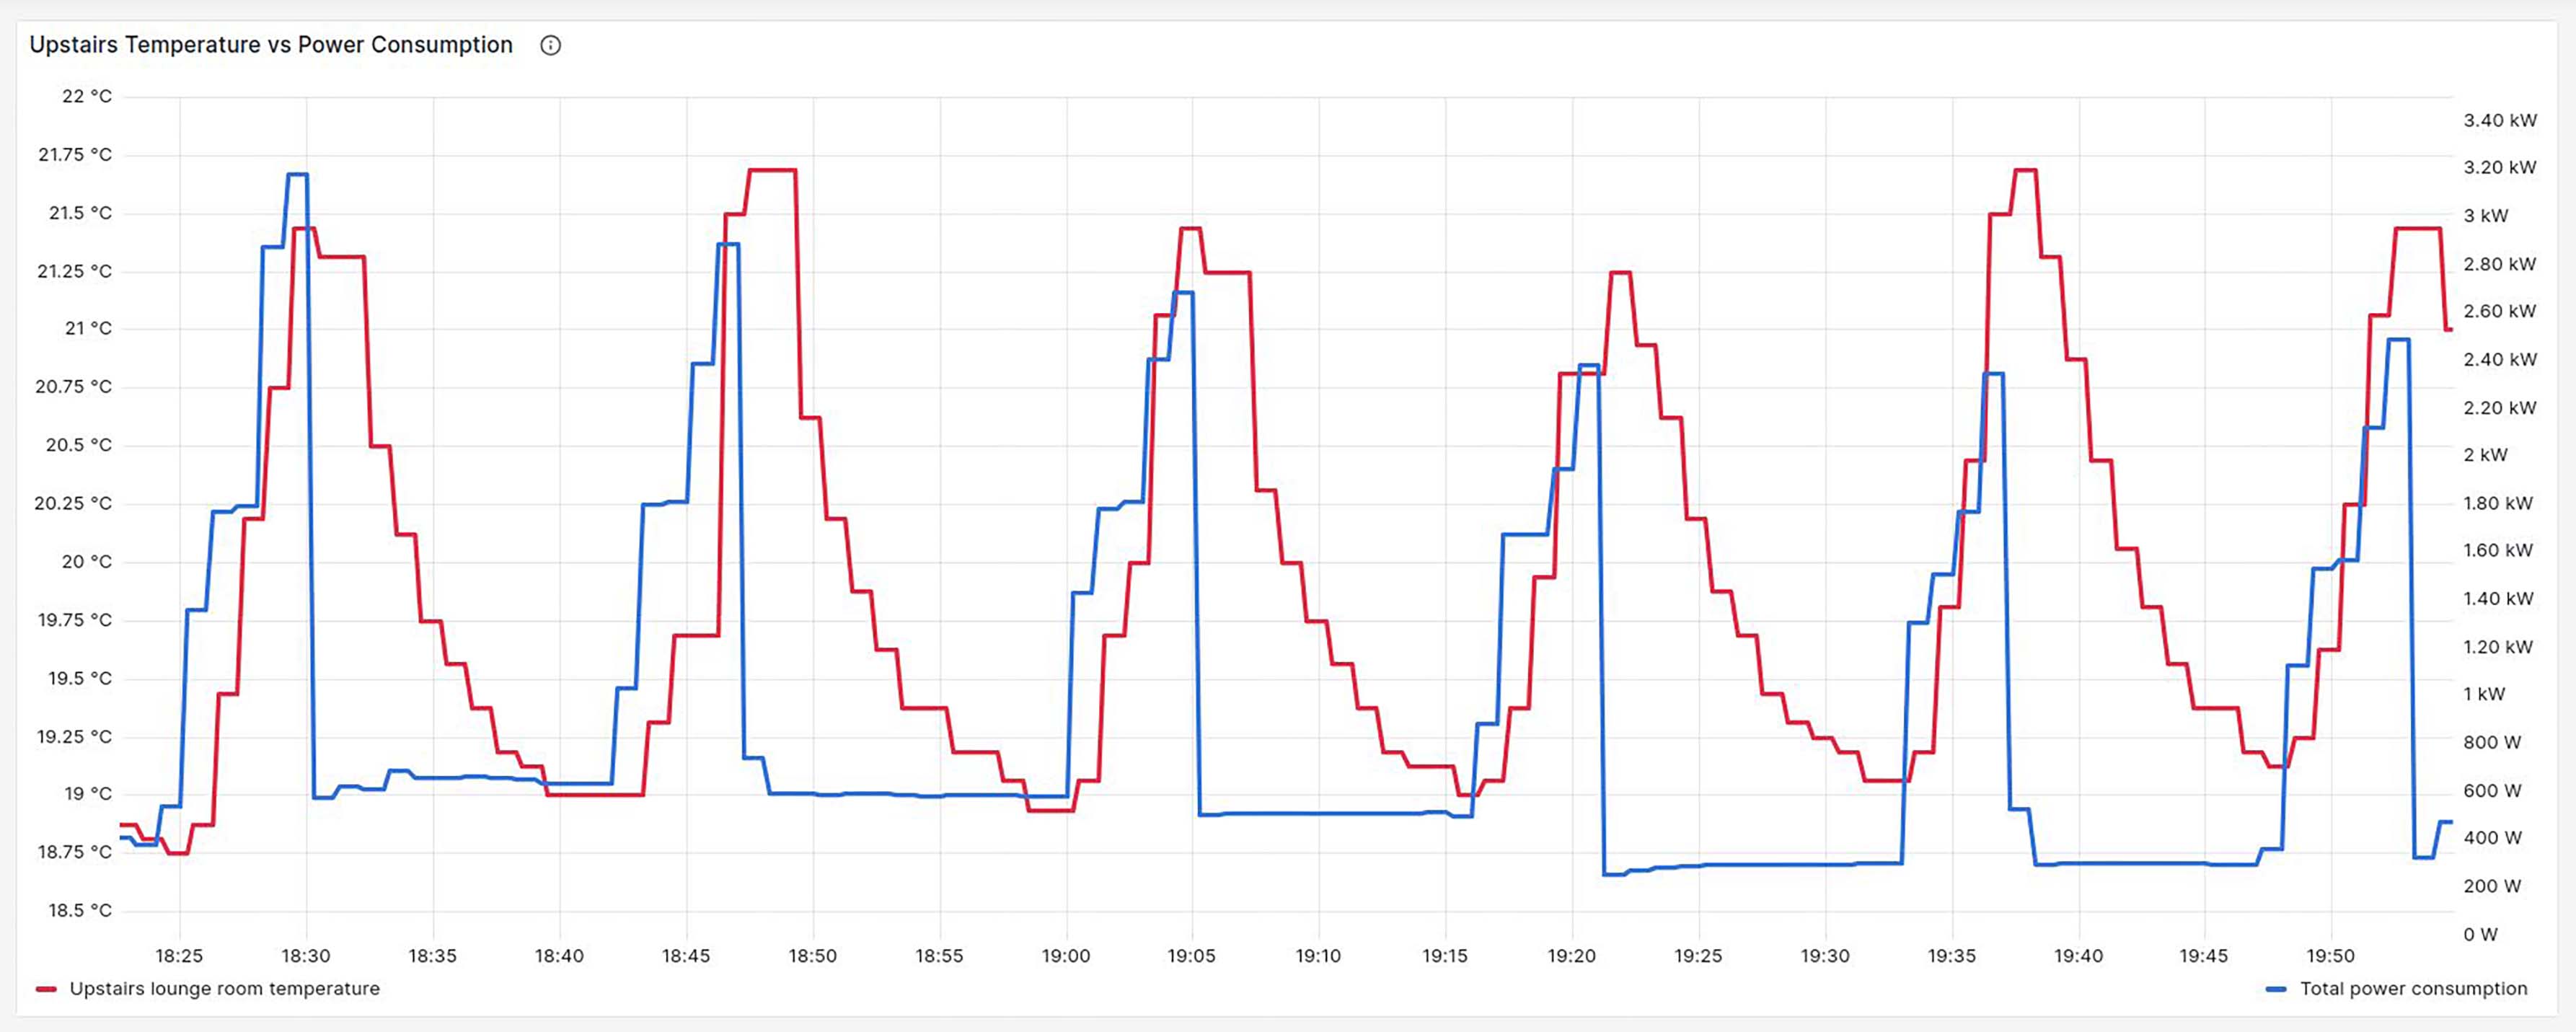
In the first graph above, the heating and cooling periods within each cycle are roughly symmetrical in length. In other words, the air conditioning was actively heating for roughly 50% of the time. However, in the second graph, the heating period is now much shorter and steeper than the cooling period which has a noticeably longer and more gradual trail off.
This means the overall energy usage from heating is less because the temperature reaches the set point much sooner and the air conditioning remains idle for longer during each cycle. The second graph shows that the air conditioning now only heats for roughly 33% of the time. This results in an overall energy reduction of about one third for heating.
Looking at the data for cooling in summer, the difference isn’t as obvious because the air conditioning doesn’t appear to cycle on and off like it does for heating. However, I was able to find two similar days where it was roughly 31 degrees outside and 26 degrees inside when the air conditioning was switched on.
Before sealing the gaps it took 60 minutes for the house to cool down and remain stable at the set point. After sealing the gaps a year later, the air conditioning cooled the house down to the set point much faster, taking only 20 minutes which is impressive.
The data and conclusions above assume that I will need to run the air conditioning for the same amount of time as before. However, due to increased air tightness and stability of indoor temperatures, there will be times when heating or cooling is no longer required at all, saving even more energy.


